These modes are very powerful construction aids. They take full advantage of the mouse. A single click-drag-release sequence constructs several elements. Moreover, the definitions of the new elements are adapted according to the mouse position. For instance, in the "Add a line" mode, the line, together with its start and endpoints, are generated. The definition of the start and endpoint depends on the mouse position when the mouse button is pressed resp. released. So, when the mouse pointer is over an intersection of two lines, then the new point will be defined as the point of intersection of these lines.
If elements are already present in the construction, they will not be added a second time. This refers not only to the definition of the elements, but it is guaranteed by Cinderella's automatic theorem checking facilities.
Interactive modes can easily be recognized in the tool bar since their icon contains a little mouse pointer symbol.
A single new point will be added using this mode usually. The mode is designed to be multi-purpose and easy to use. Pressing the left button of the mouse generates a new point. While you drag the mouse, with the left button still pressed, you can change the position and definition of the newly added point. When you finally release the mouse button the point is fixed. Its definition depends on the position where the mouse was released. Sometimes it can be more convenient to use the more powerful interactive modes ("add a line", "add a parallel", "add a circle", etc.), which generate points together with other geometric elements.
As already mentioned, constructing a point can be described as a three step procedure:
The elements that lead to the definition will always be highlighted.
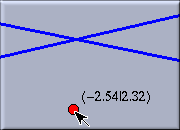
The figures below show the three main situations: a "free point," a "point on a line," and an "intersection point." Notice that while dragging the mouse the coordinates that correspond to the point's position are displayed.
| Free point: |
Point on a line: |
Intersection point: |
 |
 |
 |
Clearly a point can also be added with a simple mouse click at
the position where the point should be placed. The above
mentioned three step procedure collapses then to a single mouse
click. However, it may be a matter of taste, it is often more
convenient to take the full advantage of the three steps
mentioned above:
Press the mouse button down somewhere,
drag the point to the right position and release the mouse.
Create a new point with a press-drag-release sequence. The definition is automatically adapted.
There are two situations where it is not appropriate to add a point with this mode.
This mode allows a line through two points to be added. The mode is powerful enough to generate the line together with the two points with just one mouse action. When the mouse is pressed the first point is added. Dragging the mouse generates the second point and the line. When the mouse is released the position of the second point is frozen, and the construction is finished. The logic behind this mode is very similar to the logic behind other interactive modes ("Add a parallel", "Add a perpendicular", "add a circle", etc.).
Constructing a line in this mode is a three step procedure:
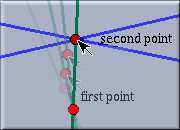
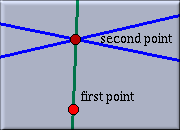
The figures below show the three stages during the construction of a line. Here the first point is a free point and the second point is the intersection of the two already existing lines.
| Press the mouse ... |
... drag it ... |
... and release |
 |
 |
 |
Create a line connecting two points by a press-drag-release sequence.
This mode creates a line through a point with a certain slope. When the point is moved, then the slope of the line stays constant. However, in the move mode it is also possible to pick the line and change its slope. So this mode could also be called "Line by slope." The mode generates the line together with the point through which it passes by a single press-drag-release sequence. When the mouse is pressed the point is added. Dragging the mouse generates the line. It is always attached to the mouse pointer. When the mouse is released the position of the line is frozen, and the construction is finished. More exactly:
Create a line through a point by a press-drag-release sequence.
With this mode you can construct a line through a point which is parallel to another line with a press-drag-release sequence. The point through which the parallel should pass can also be generated in this mode. Constructing the parallel is a three step procedure.
The figures below show the three stages during the construction of a parallel. Here the new point will be bound to the already existing point P.
| Press the mouse ... |
... drag it ... |
... and release |
 |
 |
 |
Create a parallel with a press-drag-release sequence.
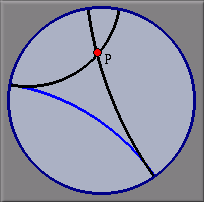
The behavior of this mode is dependent on the geometry that is chosen. While in Euclidean Geometry there is always exactly one parallel, in non-euclidean geometries it is subject to the definition of parallelity. Depending on the underlying "philosophy", in hyperbolic geometry there can be infinitely many parallels, from an incidence geometric viewpoint, or there can be exactly two parallels, from an algebraic or measurement based point of view. Cinderella takes the algebraic point of view: A parallel to a line L is a line that has a zero angle with L. So in hyperbolic geometry the mode produces exactly two parallels.
 |
| Hyperbolic Parallels |
In elliptic geometry the usual viewpoint is that there are no parallels at all. However, from an algebraic standpoint there exist such parallels, they just have complex coordinates, in other words, they will never be visible. Cinderella constructs these parallels, and they are invisible but are nevertheless present in the "Construction Text" view. From there they can be accessed for further constructions.
This mode allows a perpendicular to a line and through a point to be constructed with a press-drag-release sequence. The usage of the mode is exactly analogous to the "Add a parallel" mode. The point through which the perpendicular should pass can also be generated in this mode. Constructing the perpendicular is a three step procedure.
Create a perpendicular with a press-drag-release sequence.
The definition of perpendicularity depends on the chosen geometry.
This mode allows a line that has a fixed, numerically given, angle to another line to be constructed. The new line and a point through which it should pass can be added with a press-drag-release sequence. The point through which the new line should pass can also be generated with this mode.
When you select this mode, a little window pops up asking you to specify the desired angle.
| Input Window: |
 |
After that the usage of this mode is analogous to the "Add a parallel" mode.
Create a line with fixed angle with respect to another line with a press-drag-release sequence.
The definition of angle depends on the chosen geometry.
This mode allows a circle, given by its center and a point on its perimeter, to be created. The mode generates the circle together with the two points with just one mouse click. When the mouse is pressed the center is added. Dragging the mouse generates the perimeter point and the circle. When the mouse is released the position of the perimeter point is frozen, and the construction is finished. The logic behind this mode is absolutely analogous to the "Add a line" modus.
Constructing a circle in this mode can be described as a three step procedure:
Create a circle with a press-drag-release sequence.
The "shape" of a circle depends on the choice of the geometry.
This mode allows a circle, given by its center and its radius, to be added. When the center of such a circle is moved, then the radius remains constant. However, in the move mode it is also possible to pick the boundary of the circle itself and change the radius.
The mode generates the circle together with its center with just one press-drag-release sequence. When the mouse is pressed the center is added. Dragging the mouse generates the circle. Its boundary is always attached to the mouse pointer. When the mouse is released the position of the circle is frozen, and the construction is finished. The logic behind this mode is analogous to the "Line through point" modus.
Constructing a circle in this mode can be described as a three step procedure:
Create a circle with free radius with a press-drag-release sequence.
The actual "shape" of a circle depends on the choice of the geometry.
This mode allows a circle that has a fixed, numerically given, radius to be created. The new circle and its center are added with a single press-drag-release sequence.
When you select this mode, a little window pops up asking you to specify the desired radius, similar to the "Line with fixed angle" mode. After that the usage of this mode is analogous to the "Add a point" mode.
Create a circle with numerically given and fixed radius with a press-drag-release sequence.
The "shape" of a circle depends on the choice of the geometry.
In this mode the midpoint of two points can be constructed with a press-drag-release sequence. Analogous to the "Add a line" mode also the two points can be added.
Create two points and their midpoint using a press-drag-release sequence.
This innocent looking mode becomes interesting in non-euclidean geometries. While in Euclidean Geometry there is always a unique, finite, midpoint, in hyperbolic or elliptic geometry there are always two. Both points will be generated in this mode. When working in the Poincaré disc model of hyperbolic geometry, the second midpoint of two points in the disc always lies outside the disc. The presence of this point does not matter a lot, but there are circumstances in which one should be aware of this fact.