The definition modes use a simple "define by selection" mechanism to construct new elements. You choose a certain definition mode by clicking on its icon in the tool bar, then you are asked to select a certain number of elements in the view. After enough elements are selected the newly defined element is added to the construction. Although these modes are slightly inconvenient compared to the interactive modes, it is sometimes unavoidable to use these modes. There are four major circumstances when the definition modes should be used:
A few things are common to all definition modes and should be known in advance.
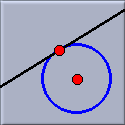
This mode constructs the center of a conic. In particular you can use this mode to construct the center of a circle. For general conics the center is the intersection of its axes of symmetry. The center of a conic is sometimes useful for constructing a point on a movable conic.
 |
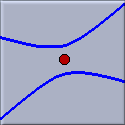 |
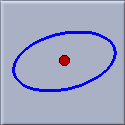
| Center of an ellipse | Center of an hyperbola |
Select a conic and construct its center.
This mode is not properly supported in non-euclidean geometries, it always constructs the euclidean center.
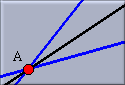
This mode is used to construct the angular bisector of two lines. The application of this mode requires a little care, since two lines do not have only one angular bisector - they have two! To take this fact into account, this mode is provided with a position sensitive selection mechanism.
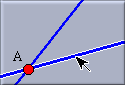
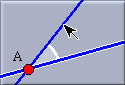
To define the angular bisector, two lines have to be selected. In order to indicate which angular bisector should be chosen three points are relevant: the click point of the first selection, the click point of the second selection, and the intersection of the two selected lines. Imagine a triangle formed by these three points. The inner angle at the intersection point of the lines will be bisected. This is what you would intuitively expect.
To make the selection process a bit simpler Cinderella gives graphical hints, as to which angle will be bisected.
 |
 |
 |
| First selection: A line is highlighted. The selection point is memorized |
Moving the mouse: An indication of the chosen angle is given. |
Second Selection: The angular bisector is added. |
Select two lines and construct their angular bisector.
The definition of angular bisector depends on the type of geometry (Euclidean, hyperbolic or elliptic). In hyperbolic geometry angular bisectors can even have complex coordinates.
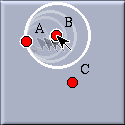
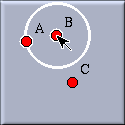
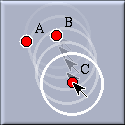
The compass is a very useful tool for transferring the distance between two points to some other place. Cinderella's compass works exactly like a real compass. You select a first point by clicking (i.e. you poke the needle into the first point). You select the second point by clicking (i.e. you adjust the compass to the distance between the first and the second point). Then you are ready to transfer the distance to another place. When you click at a third point a circle with the specified distance around this point is added to the construction.
 |
 |
 |
 |
 |
| First selection: the first point is highlighted. |
Moving the mouse: hints are shown for the distance. |
Second selection: the distance is fixed. |
Moving the mouse: hints are shown for the position. |
Third selection: the construction is finished. |
First select two points whose distance is the radius of a new circle centered at a third point.
The definition of a circle changes with the type of geometry (Euclidean, hyperbolic or elliptic).
The mirror is a multi-purpose tool for doing reflections at points, lines or circles. The first mouse-click selects the "mirror". The following clicks select the elements that should be reflected. Reflected elements are either points, lines, or conics. You can deselect the mirror by clicking on it a second time. Depending on the choice of the mirror different actions are performed.
Reflections of lines or conics are considered as pointwise reflections.
 |
 |
 |
| Reflection at a line | Reflection at a point | Inversion at a circle |
First select a mirror. Then select elements that should be reflected.
The definition a mirror image heavily depends the choice of the underlying geometry.
This mode is for constructing a circle that passes through three points. In Euclidean Geometry such a circle is always uniquely defined to be the circumcircle of the triangle defined by the three points. You choose the points one after another. The definition phase does not supply graphical hints.
Select three points. Then their circumcircle is constructed.
This mode is only available in Euclidean Geometry. In other geometries (hyperbolic, elliptic) there is no unique circle with this property.
This mode constructs the unique conic that passes through five points. It is the basic mode for constructing a general conic.
Select five points to create a conic.
If four of the five points are collinear the conic is no longer unique and a null-element is computed.
This mode constructs the polar of a point with respect to a conic. The point and the conic can be selected in any order. The polar, which is a line, is then constructed.
This mode has a few very interesting special cases that deserve some extra attention. If the point is on the conic itself then the unique tangent to the conic that passes through that point is constructed. Even more special, if the conic is a circle and the point lies on the circle then the tangent to the circle that passes through the point is constructed. Although the mode gives access to general polars this special case will most probably be its main application.
 |
 |
 |
| General Polar | Tangent to conic | Tangent to circle |
Select a point and a conic and construct the polar line of the point.
This mode constructs the polar of a line with respect to a point. The line and the conic can be selected in any order. This mode can be used to construct the point where a tangent line touches the conic.
Select a line and a conic to create the polar point of the line.
In this mode a polygon can be constructed from a sequence of vertices. Select the vertices in the order in which they should appear on the boundary of the polygon. Unlike the other definition modes, this mode does not expect a fixed number of input selections. You finish the creation of a polygon by selecting the first point of it a second time to close the polygon. For instance, if you want to construct a polygon through vertices A, B, C and D, you have to select A, B, C, D and A in this order.
If you made a mistake by selecting a wrong point, you just click the point again to delete it from the boundary of the polygon. However, only the last point in the sequence can be deselected in this way.
Graphical hints guide you through the definition phase. They always resemble the part of the polygon that has been constructed so far.
 |
 |
 |
 |
 |
 |
| 1st click | 2nd click | 3rd click | 4th click | 5th click | Finished |
Select a sequence of points to define a polygon. To finish the definition select the first point again.
This mode is only supported in the Euclidean, spherical and textual view. The hyperbolic view ignores polygonal objects.
The orientation of the polygon is important when measuring its area.
In this mode the line joining two points can be created. Select two points and the line connecting them is constructed.
This mode may at first sight seem to be unnecessary. You usually add lines with the interactive "Add a line" mode. However, under certain circumstances it can be unavoidable to use the join mode. For instance, even if a point is not reachable (or even complex) in a usual view, it is still listed in the "Construction Text" view where it can be selected and used for the join mode.
Select two points and construct their join.
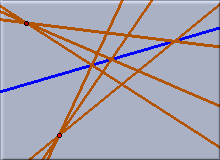
In this mode the point of intersection of two line is constructed by selecting the lines.
This mode may at first sight seem to be unnecessary. Usually points are added using the "Add point" mode, or as a byproduct of some other interactive mode. However, under certain circumstances it can be unavoidable to use the "Meet" mode. For instance when the intersection of two lines is not reachable in a usual view, the lines are still listed in the "text view" where they can be selected and used for the "meet" mode. Another case where the meet mode is a good choice is in the case of ambiguities when three lines pass through one point. Then the meet mode is a secure way of adding a certain point of intersection.
Select two lines and create their intersection.
This mode constructs the parallel of a line through a point. Select the point and the line in arbitrary order. In many cases you can use the more comfortable interactive "Add a parallel" mode.
Select a line and a point and construct the parallel to the line through the point.
The behavior of this mode is very dependent on the current geometry. Whereas in Euclidean Geometry there is always exactly one parallel, in non-euclidean geometries the number of parallels depends on the definition of parallelity. Cinderella takes the algebraic point of view: A parallel to a line L is a line that has a zero angle with L. Therefore the above mode produces exactly two parallels in hyperbolic geometry.
In elliptic geometry, under the usual definition, there are no parallels at all. However, from an algebraic standpoint there exist such parallels; they just have complex coordinates. In other words, they will never be visible. Cinderella constructs these parallels. They are invisible but still present in the "Text view", where they can be used for further constructions.
This mode constructs the perpendicular of a line through a point. Select the point and the line in any order. In most cases you can use the more comfortable interactive "Add a perpendicular" mode.
Select a line and a point and construct the perpendicular to the line through the point.
The definition of perpendicularity depends on the chosen geometry.