The most exciting feature of Cinderella is its ability to create interactive webpages. You can publish any construction, even those using several views, within seconds, and without further knowledge about HTML.
This chapter explains the three scenarios for export: Plain examples, animations and construction exercises. You also find detailed information on the exported HTML code and instructions for post-processing of the web pages, e.g. adding explanatory text.
If you are familiar with the World Wide Web and its technical background or if you do not want to bother with technicalities right now you can safely skip this section. As an aid for the further description we want to explain a few of the terms used below.
HTML is the page description language (or format) for web pages. It can be created and edited with any plain text editor, but it is much more convenient to use a special HTML editor. You can view the HTML code of a web page with the "view source" option in your web browser.
The HTML code mainly consist of the text which will be shown, enhanced by tags which describe the appearance and structure of this text. Here is an example:
<p>This is a paragraph containing some <b>bold text</b>
and some <i>italics text</i>.</p>
<p>This picture <img src="pappos.gif"> was produced
 with <a href="http://www.cinderella.de">Cinderella</a>!</p>
This fragment describes two paragraphs marked by
<p>...</p>. The first paragraph contains two regions
which should be typeset with special fonts, the first one, marked
by <b>...</b>, in bold, the second one in italics.
You might recognize the easy structure of HTML, most of the
elements are marked with opening (<something>)
and closing tags (</something>).
The second paragraph in the example shows how to include an
image using the <img> tag. This tag does not
have a closing companion, but it uses an option
(src=...) to reference the image file. You also
find a hyperlink, which is the most powerful element in
HTML. You name a location which can be reached by
clicking on the phrase included by
<a>...</a>.
Hyperlinks are usually given by an URL, an uniform resource locator. These describe resources by the protocols which give access to them. For the WWW most communication is done with the Hypertext Transfer Protocol, short for http. This explains the http:-part of the WWW addresses, which can be left out since most browsers assume it as a default. Other examples are ftp, the File Transfer Protocol, or the prefix file: which describes files that reside locally on your harddisk.
A special tag is reserved for Java integration into web
pages. Whenever a Java compatible browser encounters an
<applet> tag it tries to load the java
program referenced by the code option and runs it
inside a rectangle on the web page. The size of the rectangle is
given by the width and height options.
These programs are called Applets, as opposed to
standalone applications. The diminutive is a little
misleading, since applets can be as powerful as full
applications.
The applet tag can also contain an archive option
which describes the location of the java code. For
Cinderella we provide an archive called
cindyrun.jar which contains all the code needed for
showing and manipulating constructions. This is an example how
the applet tag produced by Cinderella's web export
functions could look like:
<applet code    = "de.cinderella.CindyApplet"
        archive = "cindyrun.jar"
        width   = 435
        height  = 231>
<param...
</applet>
You find many <param> tags which pass
additional parameters like the filename of the construction to
the applet. Never change or delete these parameters without
exactly knowing what they mean.
This is the easiest way to create a webpage with
Cinderella. Whenever you have created a configuration you
can use the export button ![]() to create an interactive webpage showing this construction in
exactly the views that you are currently using. Each view will be a
separate applet, and these applets communicate using a kernel
ID which you find as a parameter of the applet.
to create an interactive webpage showing this construction in
exactly the views that you are currently using. Each view will be a
separate applet, and these applets communicate using a kernel
ID which you find as a parameter of the applet.
The construction itself is
Next you will be asked for a filename of the web page. This should end in ".html" or ".htm", depending on your local standards. If you do not supply one of these extensions, Cinderella will assume ".html" as a default. This step finishes the web export, and you should be able to view the result in a Java-1.1 compatible web browser, after you have copied the runtime library into the export directory.
More specifically: The applet expects a file called "cindyrun.jar" in the same directory, which contains the necessary code to show and manipulate constructions. You find this file in the installation directory and you have to copy it into the directory containing the interactive web page. Consult the section on advanced options for further help.
If you experience any problems, be sure to check whether:
The exported construction is always in move mode. That means that movable elements can be dragged around within the applet rectangle. If you want to prevent elements from being movable, please use the pinning option in the Appearance Editor.
Exporting automatic animations is similar to and as easy as exporting interactive examples. Start the desired animation using the animation mode and adjust its speed using the slider. Then use the export button in the animation control dialog to export. All rules for exporting interactive examples still apply: You need three files for successful loading of the animation in a browser, the web page (.html), the construction (.cdy) and the runtime library (cindyrun.jar).
While exporting animations please keep in mind that the potential visitors of your web page might have slower computers than you. You should adjust the animation speed accordingly.
You can use Cinderella to create interactive exercises for students. However, the design of a good exercise is much more involved than the creation of an interactive construction. The export itself is easy, but for a educationally valuable exercise you should have some experience with geometry, Cinderella and teaching.
For a complete exercise three major steps are needed: Constructing, defining the input, solution(s) and hint(s), and the actual export.
You cannot create an exercise without solving it yourself in the beginning. While this is just fair, it has a more important technical reason. Cinderella uses your construction for checking the correctness of the students' solutions.
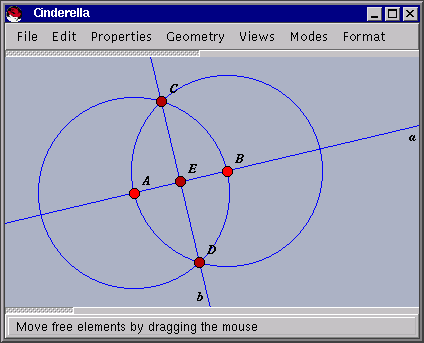
So, before you can define an exercise, you have to do an example construction. In this chapter we will use an easy example, construction of the midpoint: For two points A and B, find the point in the middle between them, using only ruler (lines) and compass (circles). Here is how you can solve this task:
 |
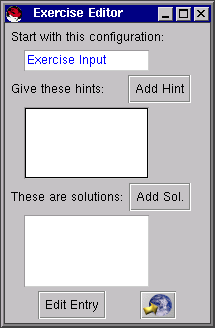
After you did the example construction open the exercise design dialog
via the appropriate button in the toolbar ![]() or the entry in the file
menu. Next, open the Input Editor by double-clicking the
"Exercise Input" entry. Now you will have three windows on your
desktop.
or the entry in the file
menu. Next, open the Input Editor by double-clicking the
"Exercise Input" entry. Now you will have three windows on your
desktop.
 |
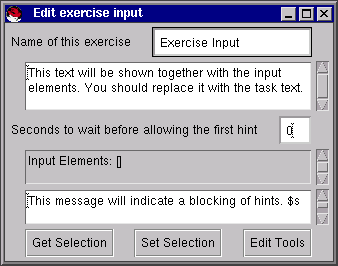 |
| The Exercise Editor | The Input Editor |
Change the texts shown in the Input Editor. The name of the exercise will be used as a reference only, it will not show up in the final exercise. Change it to "Midpoint", nevertheless. The first text in the Input Editor will be presented to the students as the exercise task, so you should enter the task text there (after deleting the default text).
Later we will define hints which lead the students to a correct solution. If you want to block hints for some time after presenting the taks, enter the number of seconds in the appropriate field. You should also change the message in the last field, which will be shown when a hint is requested before the blocking time has passed. The string $s will be replaced by the number of seconds after which a new hint will be available.
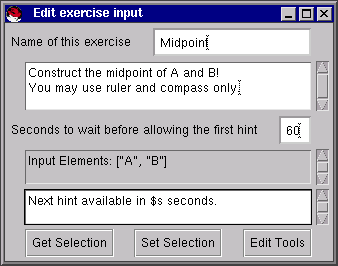
After these changes, the Input Editor should look approximately like this:
 |
So far you have not defined the start elements for the
construction. Since the students should start with the points
A and B you select these points in the main
construction window. Use the selection mode ![]() . Then you define the input with
the "Get Selection" button in the Input Editor. "A" and "B" show
up as input elements.
. Then you define the input with
the "Get Selection" button in the Input Editor. "A" and "B" show
up as input elements.
 |
Now you have defined everything you need as input for the exercise. The hints and the solution are still missing. If you want, you can close the Input Editor now.
Next we will define the solution, which will later be used for checking the correctness of the exercises. It is possible to define several alternative solutions for ambiguous exercises, like "define an angular bisector of lines l and g".
Here we only have one solution, the midpoint E. First press "Add Sol." in the Exercise Editor, then double-click on "Solution #1" to open a Solution Editor.
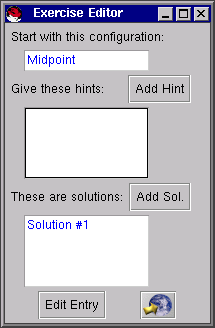 |
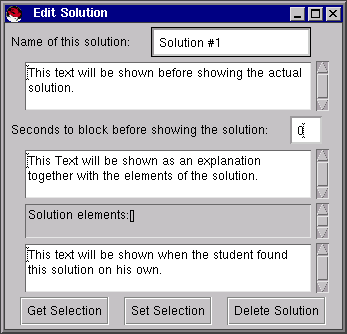 |
The first text area in the Solution Editor can contain a text that will be shown when a hint is requested. If you do not want a hint text then you should delete the text contained there, otherwise you can replace it with a custom message. We will replace the text after we have defined additional hints. Until then, just erase it.
The second text area contains the message that will be shown when the solution is presented to the student. It should describe the situation that you will present as an example solution.
The last text area is used for a message that will be shown when the student completes the exercise. You should replace it with a friendly and encouraging message!
We still have to define the solution elements. As we said above this is only E. Select this point and click on the "Get Selection" button. It should appear as a solution element in the editor window.
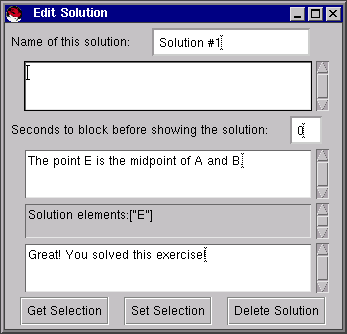
|
If there were several solutions for this exercise we could add another solution, which would be accepted by the automatic theorem checking engine like the first one. When the students requests hints, only the first solution will be used. An example for an exercise with multiple solutions is "Construct a equilateral triangle over the segment AB"; there is a triangle above and a triangle below the segment.
You could export the exercise at this moment. However, we want to define some hints for the students, too.
An important step in the midpoint construction are the two circles. Their radical axis will pass through the midpoint. So, we add a hint for this. Add a hint in the Exercise Editor with the "Add Hint" button and double-click the "Hint #1" to open a Hint Editor.
 |
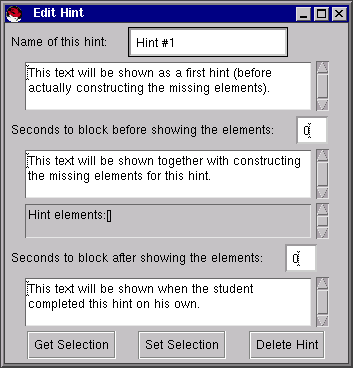 |
Hints are similar to solutions. In fact, the only real difference is that the exercise is not yet solved when a hint has been found or requested.
Replace the default texts with your custom messages, like you did with the solution. Then, select the two circles and click on the "Get Selection" button. The screenshot shows the Hint Editor after these actions.
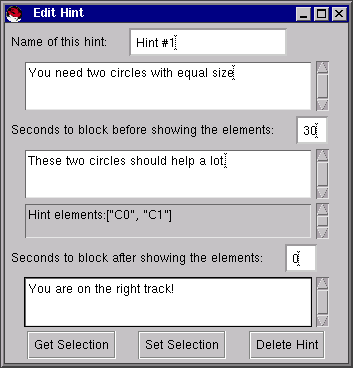 |
The first text will be shown when the first hint is requested. When the student requests another hint the two circles will be constructed, but this will work only when 30 seconds have passed since the first hint.
You could define further hints now by clicking the "Add Hint" button again, but for our example this should be sufficient.
You did not define the available tools for the exercise yet. In that case a default toolbox will be used, which includes the "Add point", "Add a line", "Compass" and "Move" modes, and action buttons for "Undo", "Give Hint" and "Restart Exercise". If you want to add other tools or remove some of the above you can do so by clicking the "Edit Tools" button in the Input Editor.
 |
You add a tool by clicking on the appropriate button in the upper half of the Tool Editor, you remove it by clicking on its buttons in the lower half, which displays the tools that will be available.
For the example you might want to replace the compass by the "Add Circle" mode, but you can also accept the tools as they are.
When you are satisfied with the exercise you can create the
corresponding HTML code for the web page with the export button
![]() .
.
The export is similar to the plain example or animation export. You have to save the construction and you have to save the HTML code into the same directory. Cinderella expects the cindyrun.jar file there, too.
Before the export the software will do some sanity checks on your exercise, for example it checks whether there are input elements and solution(s).
In addition to the currently open ports there will be two extra applets, an exercise console where the messages will be shown, and a control panel with the tools. The sizes of these applets are always the same, but you can edit them later directly in the HTML code, if you wish. Please refer to the tips and tricks section below.
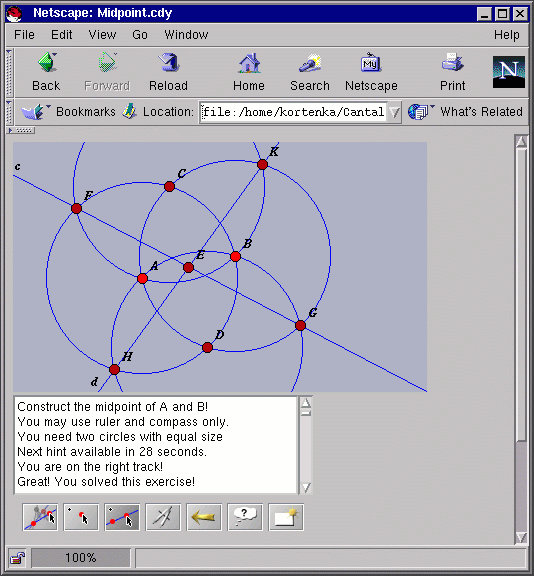
After you have exported the exercise you can visit the HTML file with your browser in order to test the exercise. You should ensure that your hints and solutions make sense.
If you want to change texts or elements you can load the .cdy-file of the exercise and use the Exercise Editor. All exercise data will be saved in the .cdy file and can be manipulated later.
 |
The web site containing your construction or exercise is very basic. Cinderella does not try to be a full-featured web editor. You can use any other web editor for post-processing the HTML files.
The width and height parameters of the applets can be changed, if you want to. This is important for the exercise console and control panel, since their sizes are fixed within Cinderella. The view sizes, however, should be set to the correct size before you export the construction, since this is much easier.
Never change the kernelID parameter of the applet, it is important for inter-applet communication. The order and placement of the applets can be changed arbitrarily. You can also merge two different HTML pages, which gives you the possibility of showing different constructions on one web page.
If you have several Cinderella-enabled pages on your web site you can use a single cindyrun.jar for all these. Then you will have to change the archive parameter of all your applets to reflect the location of your central cindyrun.jar. It should be sufficient to include the complete URL of its location in the archive tag, like in this example:
<applet ... archive="http://www.yourweb.edu/directory/cindyrun.jar" ...>
With Cinderella you purchased the license to redistribute the necessary runtime library for interactive web pages under certain conditions. We want to summarize these conditions, but keep in mind that the only legally binding terms can be found in the License Agreement.
First of all, you should not try to make money out of your examples, that is, sell them or put them onto a commercial online service. You can certainly use them for teaching (even if you get paid for this). If you want to publish a book or CD-ROM which uses Cinderella, you should contact Springer-Verlag and the authors to get a written permission.
You are not allowed to give away any other files than cindyrun.jar of Cinderella, this covers the cindy.jar file (note the difference!) and the online documentation, among others.
Whenever you are unsure about your license, please contact Springer-Verlag in writing or via eMail. You can find contact details on the Springer website at http://www.springer.de or http://www.springer-ny.com.